Showing posts with label DIY. Show all posts

DIY: String Trellis


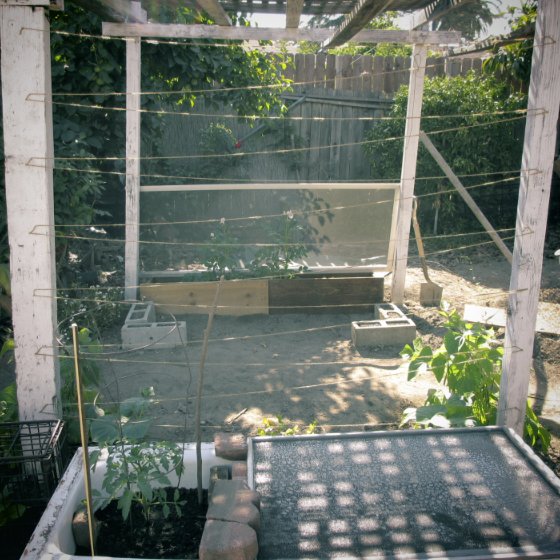
I had this really great (though not that original) idea to staple up my own string trellis. It was so easy to do one can't call it a task even.  I simply took my spool of natural string and stapled it taut to the posts where I wanted my string trellis to be (the above picture is the end product).

After sitting dormant for about a month or so the string trellis is finally being used by a pair of growing cucumber plants, if you take a look at the picture below you can see the cucumber vines holding on tightly to the string to work their way up- it's very exciting and a tad bit cute I have to say.


For awhile I did think about replacing the string trellis as I found that the natural string I used was slightly sagging due to the exposure of wetness and sunshine, but now that I've seen that it really makes no difference when the cucumber begins to hold on and to climb... I am very pleased with it afterall, and cost me only $2.00 to make (for the spool of string).

I can't wait to see how beautiful the area will look with little cucumbers hanging from the trellis, I'm sure it'll give the backyard (which does need alot of work still) a charm that is lacking as well as yield more vegetables per square foot< since now I'm working vertically. A friend of mine who only has a small outdoor patio to work with (and when I say small, I mean small) setup a trellis with rope and grew a variety of pole beans which ended up being absolutely beautiful and of course was a great way to use the small space to grow.  Happy Days!


DIY: Cucumber And Bottle Cloche Are Good Friends


I planted two cucumber seeds on both sides of a wooden frame structure in the middle of the yard, the plan was to have the cucumbers climb the wooden beam and up the wooden structure to create height and beautiful green foliage around this otherwise old and rickety frame.  Within 5 days of planting the seeds the little cucumber seedlings with rather cute and rounded seed leaves popped up out of the ground, I immediately took to saving the seedlings from outside forces such as birds and slugs.  I sprinkled coffee ground around the seedlings and put a cover of strawberry baskets I had saved for such an occasion.  The very next day as I walked around the yard inspecting all the vegetables and fruit plants I am endeavoring to grow (something I do daily) I realized that one of the cucumber seedlings was gone, completely gone.  I stared at the ground where the seedling used to be and was confounded, there was no seedling at all, it was as if it had not existed, this was quite odd as usually there is some remanence of the plant left even if it has been attacked, but there was none at all.  I dug with my fingers where the seedling used to be and not even the root was found- very odd.  When I found that the seedling was missing I immediately thought the slugs had gotten to it but I never found slugs to be so thorough before.  Still, I do not know what it was that took that little cucumber seedling.  Naturally I replanted another right away but before doing so took the precaution and made a bottle cloche for the remaining cucumber seedling that had escaped this unfortunate happening.

My worry with the bottle cloche was that it would not allow enough air circulation resulting in some kind of unwanted growth due to moisture buildup, this was not the case however, instead I find that the cucumber seedling loves and thrives in the warmth and moisture the cloche allots it.  While waiting for my replanting seedling to germinate and sprout I took to a watchful eye on the lucky surviving seedling that I had covered with the bottle cloche, indeed the seedling grew larger and healthier looking, the seedling leaves growing rounder and sturdier, and has yet to be eaten by the mysterious thing that ate the first.  So when the replanted seedling finally sprouted four days later I immediately knew what I had to do to keep it protected, healthy and happy.


WHAT I NEEDED:
Scissors
Exacto knife (or any sharp knife to cut through a plastic bottle)
A plastic bottle (without the cap)


WHAT I NEEDED TO DO:
1. Carefully, using the exacto knife and scissors cut the bottle in half (towards the end of the cut the exacto knife was difficult to use to make the final slice and so I used the scissors to make the final cut).


2.  Place the cloche with cut-side down into the ground around the plant with the hole at top for air-circulation.


DIY: Potatoes In A Bottomless Planter Box


A week ago I dug a trench in part of the yard to plant potatoes in, it was literally a trench which consisted of a bottom with sides that sloped upwards toward mounds of dirt.  I made holes for my already sprouting potatoes that I had kept for a little too long in the kitchen, watered them in and covered them up with soil.  As I watered them through the week I came upon the annoying situation of the mounds of dirt slowly crumbling into the potato trench.  So when the next weekend rolled by I went immediately to crazy work mode and built a bottomless box to: 1. Keeping the unecessary dirt out, 2. Create an easier time for me to hill whence the time came, and 3. Keeping the yard looking nice and organized.

Let me get back to "hilling" just incase you have no idea what that means.  Hilling is basically mounding dirt around the growing stem of the potato plant.  Pictured below (where the little orange arrows are) you can see the stem and leaves of the potato plant pushing out the through the soil, once the potato plant reaches about 8-12 inches you simply mound dirt to cover 2/3 of the stem, you keep repeating this process until the potato flowers appears at which point you know the potatoes are almost ready to be pulled out, but not quite, because you have to wait for the leaves and flower to whither and turn yellow before you do so.  The whole idea is (well it's not really an idea since it really does occur) is that hilling creates more space for more potatoes to appear, the covered portion of the stem in the process of hilling allows more potatoes to form on the stem covered by the dirt.  "Hilling" is also called "challenging".


So in an effort to make it easier for the hilling process and because of the annoying excess mounds of dirt crumbling into my potato space I gathered 5 pieces of wood and a few nails to build a box to enclose the potato trench in.  I was pretty pleased with myself once the work was done :)  You can make it easier on yourself and simple grab two long boards for the long side and 2 short boards for the short sides and nail them to create a box frame that has neither top or bottom, in my case however I hadn't two long boards, just 5 medium length boards and so went on to make a long rectangular frame that way; by nailing to medium boards at the ends to creat one long board (doing the same for the other long side), then cutting in half the remaining medium board to create two shorter boards for the short sides, I then nailed it into a box frame.  It did turn out mighty fine if I do say so myself.


Read the following post on Getting The Most Out Of Your Potatoes By Challenging