Results: Watering my blueberry bush less when it was beginning to turn red

BEFORE

Almost a month ago I was concerned about my baby blueberry bush which was, I noticed< turning red in color.  After much research I found out that the red leaves were not normal for Summer although common for blueberry plants during Winter.  On a very helpful blueberry site, Backyard Berry Plants, the question was posed:

Q: Why are my blueberries leaves turning red?
A: They do this for different reasons.  They turn red in the fall of course (and orange/yellow), and that is expected.  It if is spring or summer and this is happening, your pH could be too high and /or they are not getting enough nitrogen.  I usually put a couple full shovels of peat moss around each plant in the spring, along with its annual spring fertilizer treatment, and I have never had this problem in my production bushes.  I am more likely to see it in potted nursery plants, as pH and nitrogen can rapidly change given increased watering (leaching nitrogen and raising pH) and temperatures (increased plant growth with not enough nitrogen).


After reading this interesting information and realizing this might very well be the case for me (I was watering my blueberry bush every other day if not everyday) I decided to water my blueberry plant less.... way less, let's say roughly twice a week.

Now, over three weeks later my blueberry plant is looking more green and less red!

AFTER


Read the previous post, Backyard Berry Plants, Specializing in Organically grown blueberry, blackberry, and red raspberry plants


Caught In The Act: Chili Peppers short & stout


The currently little chili peppers are... quite little, short and stout to be exact, but soon enough they will grow to be about 7-8inches long.


The flowers of the chili pepper plant bloomed and from the blooms out came the chili peppers.


Today's Lesson: Getting acquainted with the bloom structure

Often we display flowers in vases as a way to beautify the home, or display them in wrappings as a gift (very popular for birthdays, dates and holidays), but have you stopped to think that flowers, the bloom that is so enchanting and beautiful with many a variety of colors that women like to stick their noses in and inhale deeply and say "how wonderful that smells" is actually the reproductive organ of the plant? < Yes, very much like the penis of a man and the vagina of a woman.

The bloom of a plant (or as many others like to call them, the flower) has but one intention, to reproduce, the beauty of flowers is a mere side affect of their endeavors to reproduce.  As I've seen on a couple of my grows in the garden the bloom is often followed by the vegetables, the flowers often is pushed out.  This lead me to a curiosity of the plant blooms themselves, the structure and the workings, it seemed pretty important to know the basics of especially as a grower.

Here is the interesting information I found on on Wikipedia...

The biological function of a flower is to effect reproduction, usually by providing a mechanism for the union of sperm with eggsSince the flowers are the reproductive organs of plant, they mediate the joining of the sperm, contained within pollen to the ovules - contained within the ovary.  Pollination is the movement of pollen from the anthers to the stigma. The joining of the sperm to the ovules is called fertilization.  Normally pollen is moved from one plant to another, but many plants are able to self pollinate.


A stereotypical flower consists of four kinds of structures attached to the tip of a short stalk.  Each of these kinds of parts is arranged in a whorl [a circular arrangement of like parts, as leaves or flowers, around a point on an axis, shaped like a coil completing a full circle, Dictionary] on the receptacle.  The four main whorls (starting from the base of the flower to lowest node and working upwards) are as follows:

  • Calyx - the outermost whorl consisting of units called sepals; these are typically green and enclose the rest of the flower in the bud stage, however, they can be absent or prominent and petal-like in some species.
  • Corolla - the next whorl toward the apex, composed of units called petals, which are typically thin, soft and colored to attract animals that help the process of pollination.
  • Androecium (from Greek andros oikia: "man's house") - the next whorl (sometimes multiplied into several whorls), consisting of units called stamens.  Stamens consist of two parts: a stalk called a filament, topped by an anther where pollen is produced by meiosis and eventually dispersed.
  • Gynoecium (from Greek gynaikos oikia: "woman's house") - the innermost whorl of a flower, consisting of one or more units calls carpels.  The carpel or multiple fused carpels form a hollow structure called an ovary, which produces ovules [plant part that contains the embryo sac, the female germ cell which after fertilization develops into a seed, Dictionary] internally.  Ovules are megasporangia and they in turn produce megaspores by meiosis which develop into female gametophytes.  These give rise to egg cells.  The gynoecium of a flower is also described using an alternative terminology wherein the structure one sees in the innermost whorl (consisting of an ovary, style and stigma) is called a pistil.  A pistil may consist of a single carpel or a number of carpels fused together.  The sticky tip of the pistil, the stigma, is the receptor of pollen.  The supportive stalk, the style, becomes the pathway for pollen tubes to grow from pollen grains adhering to the stigma.

Pollen may be transferred between plants via a number of 'vectors'. Some plants make use of abiotic vectors - namely wind or, much less commonly, water.  Others use biotic vectors including insects, birds, bats, or other animals.  Flowers of plants that make use of biotic pollen vectors commonly have glands called nectaries that act as an incentive for animals to visit the flower.  Some flowers have patterns, called nectar guides, that show pollinators where to look for nectar.  Flowers also attract pollinators by scent and color.  Still other flowers use mimicry to attract pollinators.  Some species of orchids, for example, produce flowers resembling female bees in color, shape and scent.


*Read the full article on flowers on Wikipedia


First Bloom: The chili pepper plant


The blooms of chili peppers are beautiful white flowers that is shaped similar to an aniseed star with five petals.  The most prominent feature of the bloom aside from their charming looks are the anther connected to the tip of the filament (aka those little antenna-like things situated in the middle of the flower).  The anther looks very much like the seeds found inside a chili peppers, not a coincidence- I'm sure.


First Bloom: Tomato cherry plant


Here is the first bloom of the Red and Yellow Pear Blend Cherry Tomatoes. The bloom(s) looks a bit odd as if it has two heads :/, consisting of layered, elongated, triangular shaped petals that will unfold slowly layer by layer to eventually open up completely.


Caught In The Act: Cucumbers Pushing Forth


First the beautiful yellow flowers bloom... only to be pushed out by tiny, spiky cucumbers- very much like the way slender beans formed on my bean bush. Aren't the baby cucumbers just darling?!


The squirrel in the fig tree


We've got all kinds of critters and things perusing our backyard for edibles. Some more welcome and more cute than others, like this little squirrel for example.  I'm a sucker for the cute furry ones which probably do a lot more damage than the little buggy things that I dislike so much.  This squirrel has been quite a little devil to my grows especially the trees.  He likes to jump from tree to fence, to wall, to garage top, to wall again, to other trees.  I often find him rustling around in the fig tree, he doesn't seem to eat more than a couple figs at a time before he tires of them and then moves on to the next backyard, I let him stay because... like I said before, I'm a sucker for cute furry things.


DIY: String Trellis


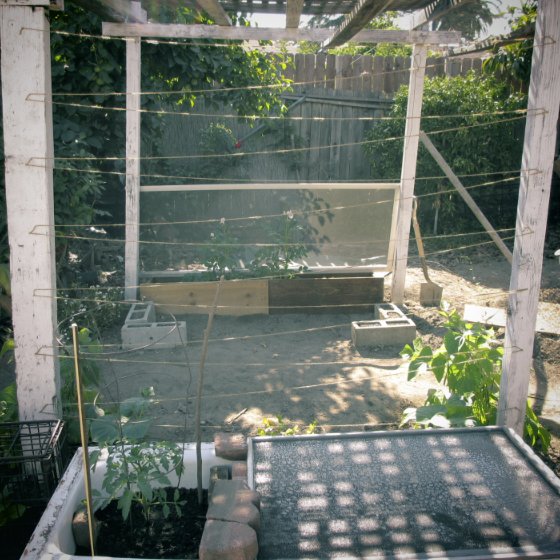
I had this really great (though not that original) idea to staple up my own string trellis. It was so easy to do one can't call it a task even.  I simply took my spool of natural string and stapled it taut to the posts where I wanted my string trellis to be (the above picture is the end product).

After sitting dormant for about a month or so the string trellis is finally being used by a pair of growing cucumber plants, if you take a look at the picture below you can see the cucumber vines holding on tightly to the string to work their way up- it's very exciting and a tad bit cute I have to say.


For awhile I did think about replacing the string trellis as I found that the natural string I used was slightly sagging due to the exposure of wetness and sunshine, but now that I've seen that it really makes no difference when the cucumber begins to hold on and to climb... I am very pleased with it afterall, and cost me only $2.00 to make (for the spool of string).

I can't wait to see how beautiful the area will look with little cucumbers hanging from the trellis, I'm sure it'll give the backyard (which does need alot of work still) a charm that is lacking as well as yield more vegetables per square foot< since now I'm working vertically. A friend of mine who only has a small outdoor patio to work with (and when I say small, I mean small) setup a trellis with rope and grew a variety of pole beans which ended up being absolutely beautiful and of course was a great way to use the small space to grow.  Happy Days!


Cucumber vines holding on


I've been completely charmed by the cucumber as of late, specifically to their efforts of holding onto the string trellis I put up for them, their endeavor to climb up is fascinating.  Their little vines curl up and in some places have even created knots around the string to hold themselves up.


See the previous post, Cucumber Vine, to see how these vines got started


First Bloom: Cucumber plant flowers


Lively yellow flowers bloomed on the cucumber plant


First Bloom: The potato plants blossom


The potato plant's first blossom can't be described as anything else but intriguing cute flowers that consists of light pink petals with bright yellow middles.


Today's Lesson: Know They Enemy, The Figeater Beetle


My mom came for a short visit today, minutes after she arrived I found her in my yard chasing Figeater Beetles from the fig tree with a toilet bowl cleaner, who would think a toilet bowl cleaner would actually work {though I probably wouldn't recommend anyone else trying this method}, all I had to say was "Thanks Mom, I didn't have the guts to do it but apparently the crunching of these huge insects don't bother you- you've got balls."  What I thought was just one Figeater Beetle getting comfortable in my fig tree actually turned out to be many- ick, I'll definitely have to invite Mom over more often.

The nuisance as of late that I've been having with the Figeater Beetles has led me to believe that yes, Today's Lesson should cover the Figeater Beetle which apparently is mistaken quite easily for the Green June Bug and the Japanese Beetles.  A lot of the information I read about this green jewel of an insect seems to say that the Figeater Beetle is not as destructive as the Japanese Beetle which tend to eat all the foliage and soft fleshy fruit, instead the figeater beetle tend to stick with eating soft fleshy fruit< in my opinion this is a matter of perspective, if you've got many soft-flesh fruiting trees than the Figeater Beetle will be quite a nuisance to you opposed to those who have only a couple soft-flesh fruiting trees or none at all.  In my yard the figeater will most definitely be a problem as I have no less than five soft-flesh fruiting trees.

'Adult figeater beetles grow to approximately 1.25 inches. They are dull green on the top and a brilliant iridescent green on the underside and legs. They are active during daylight hours, often congregating in the shade of trees near choice breeding grounds to find mates. They makes a loud buzzing sound similar to that of carpenter bees.' -Wiki


Whilst digging around in the soil of my tomato bed, where tomato seedlings used to stand before they were violently taken to their deaths by some mysterious rodent or some other, I found in the soil a larvae that looked very much like the ones above. I didn't know what it was and tossed it aside onto the ground but it looked very much like a figeater beetle (as shown above) and now feel pretty confident that that is what it was.

'Pupation occurs in the spring and adult figeater beetles emerge from July-September. After mating, eggs are laid in decaying matter or compost piles, which provide sustenance for the larvae when they emerge.' -Wiki

The figeater Beetle are large round and quite heavy for their wings it seems they bumble around quite clumsily, I'd often find them falling from the fig tree but they seem to be pretty hardy physically and none of the falls I've witnessed seem to do them any harm.  As it so seems {and also from what I've read around} the Figeater Beetles are quite harmless and can even be picked by hand, so... if you've got the nuts that I haven't, go for it.

SUGGESTED METHOD FOR TERMINATION:
Pick the beetles by hand and squash them underfoot


*Read the full article on Wikipedia, Figeater Beetle


The Figeater Beetle That Calls The Fig Tree Home


As of late my heart starts pounding when it comes time to pick figs off the fig tree, a large Figeater Beetle has been living in the fig tree and is quite the bully when it comes to me picking the fruit.  He often flies over my head faux-diving at me to scare me away - it works, I go running with arms flailing the wimp that I am towards insects and things. Apparently they make terrible pests in the garden eating through soft fruit like no other {so now I wonder no longer why many of my ripe figs are left hanging with only skin sagging and juicy insides all a missing}, what's worse is that all the half devoured fruit has attracted numerous amounts of flies to the fig tree. Suggestions say to kill them straight away no matter how pretty they are to look at, as for me, they may not look all that attractive they just look like big fat flying insects, but even so killing it is a hard thought.  What one must do?  Squash them under foot?  Ew, I shudder just thinking the crunch it would make.  So for now, I'm allowing it to stay in the fig tree.


Budding Potato Plant


The little buds of flowers have begun to appear on a couple of my potato plants which tells me that it won't be all that long until I'll get to harvest some spuds.  My goal for the potato plants is to harvest mature potatoes which means shortly after the flowers bloom the leaves of the plant will begin to yellow and whither at which point I am to cut watering completely for two weeks and then it should be ready to be dug out.

On my first attempt at growing potatoes I dug out the potato plant too soon, much too soon, and all I got was four little, tiny spuds, and when I say "little tiny" I mean truly "teeny tiny".  And this is how I learned the importance of allowing the potato plant to go its course for two weeks without watering, I found myself more and more impatient with the first potato plant- I would just look at those yellow dried up leaves and think 'those potatoes need to come out!' But I was wrong of course, so this time, I am determined to allow the plant to sit for 2 weeks once the leaves begin to yellow and whither.


Backyard Berry Plants, specializing in Organically grown blueberry, blackberry, and red raspberry plants

As you well know I planted a young blueberry bush from Wholefoods in my backyard, some of the leaves are turning a weary red, some leaves worse than others and some just beginning to around the edges, yes I am quite distraught, what do I do?!


I went on the web to seek out some answers and came across this fantastic site called Backyard Berry Plants, the pros of organic backyard berry bushes!  Just what I need! This is what I found in regards to the redness on my blueberry leaves,

Q: Why are my blueberries leaves turning red?
A: They do this for different reasons.  They turn red in the fall of course (and orange/yellow), and that is expected.  It if is spring or summer and this is happening, your pH could be too high and /or they are not getting enough nitrogen.  I usually put a couple full shovels of peat moss around each plant in the spring, along with its annual spring fertilizer treatment, and I have never had this problem in my production bushes.  I am more likely to see it in potted nursery plants, as pH and nitrogen can rapidly change given increased watering (leaching nitrogen and raising pH) and temperatures (increased plant growth with not enough nitrogen).

From what I gather, and of course I can't be sure, I may be watering my blueberry bush too much.  So I must take action!  Less watering {which I have been doing daily, daily too much apparently} and more nitrogen.  I have been dressing the blueberry bush every now and again with coffee ground {for nitrogen purposes} but I did not take into consideration that watering sucks the nitrogen out of the soil thus making it unusable for the plant.

Stay tuned for results!


Read the results, Results: Watering my blueberry bush less when it was beginning to turn red


Reap & Eat: Sun-Drying Figs


What do you do when you have a fig tree that just keeps on giving?  You dry them of course!  This is my first time ever sun-drying figs or anything for that matter {there seems to be a lot of firsts for me in the gardening world- this makes me happy}.  

Having no real contraption to sun dry figs in I made one on the fly using an old cabinet door that was lying around in the garage, a bake drying rack, a few bricks and an old window screen {like so, as seen below}, I know, totally janky right? But it works great! 


The bake drying rack is perfect for drying figs on since the rack has little feet keeping it off the ground, meaning air circulation underneath the figs as well as over {which I think may be of some importance}.  The bricks are quite short when laid on their sides and makes a great barrier to hold the screen up, both low bricks and window screen are great items to use to allow ample sun light through while keeping bugs, pests and birds away.


I'm drying out the figs all-natural, I simple pick them from the tree when looking ripe enough which means slightly soft to the touch and purple all around.  Some figs fall off the tree when they're ripe but mine do not, they just burst or to be more precise, open up- it's actually looks quite disturbing, the fruit peels open from the end and all the seeds are exposed {very alien-like}. Anyhow, I pick the fruit when they are just ripe, give them a quick wash and throw them into the sun-drying rack.  I put out the drying rack in the morning when the sun is out and take the rack in at sundown to protect the figs from the night time moisture {which I also think is probably important to do}.


So far I've been drying for about a week, the figs aren't quite done to be called sun-dried figs but I had the pleasure of eating one today anyway.  I cut the fig in half, the outer skin was quite dry, the layer of skin right underneath the outer layer was a little chewy and the inside was like jam.  I have to admit I was a little hesitant to eat it, I've never sun-dried anything before you see, but I ate it and it was... really REALLY good :)  It tasted of fig jam and the chewy skin was actually quite pleasant with the jammy filling.  Apparently you can eat the drying figs at any stage! < How awesome is that!


Growing In-Doors Versus Growing Out-Doors

Growing in-doors may seem like an easier task than growing out-doors but in my experience I found that growing in-doors can be a lot more of a challenge.  Giving the plant the natural environment it needs to grow properly and healthily can be an obstacle when you don't have what is necessary, sometimes even creating that environment doesn't work out the way you want it to.

Proper air-circulation was the most vital factor that my plants lacked when growing in-doors, this caused quite a few bugs to arise from unhealthy plants as well as other infections. Air-circulation is just as important  as the amount of water and sun the plant gets and is most definitely not to be overlooked when considering growing plants in-doors, this obviously can affect where you place your growing plants.  In most cases the plant will be placed next to a sunny window but if that particular sunny window doesn't get enough air coming in then you may have a problem, as I had... with bugs in particular, and I think we can all agree that bugs is not something one wants a problem with in their home.  If you have a sunny window with a good amount of air coming through always opt to place plants next to that particular window, whatever kind of vegetable plant you are growing doesn't matter when it comes to air-circulation, they all want it.

Whichever type of home you have, whether apartment or home, if you have a spot outside where you can place your growing plants, do so.  The important thing to remember is that you don't need to have a yard to grow, a fire escape for potted plants or a window ledge for boxed planter beds also are good places, this way your plants can get proper air flow.

MY EXPERIENCE growing in-doors versus out-doors
When I first decided to grow vegetables I was living in a one-bedroom apartment with one sunny window that didn't get too much air flowing in and out.  I lined quite a few plants on that one sunny window and made sure to keep the windows open during the day, I figured if my plants had any problems it was more likely due to lack of sun, as it happens it wasn't so much the lack of sun light rather than the lack of air-circulation.  At some time little flying bugs became a problem, the problem had gotten bad enough for me to put out little dishes of vinegar to trap and drown them (I caught quite a few that way :)  At the time I figured I just wasn't that good at growing and I still believe that somewhat but have slowly been gaining confidence since I've started my organic garden in my new yard, which I'm finding to be loads easier.

Today, as my plants begin to grow in my yard out-doors I'm beginning to realize that perhaps it wasn't really so much that I didn't know how to grow but that the external conditions simply wasn't good enough to grow healthy plants in my apartment.  Plants need a certain amount of full-sun exposure, need certain amount of watering and proper air-circulation, all these things are naturally available outside and requires discipline, hard-work and diligence to create that natural environment in a setting where it is not available.

But don't be disheartened should you be an in-door grower, I have seen many apartment dwellers build perfectly beautiful small garden in-doors on their window sill, on the fire escape and even inside their apartments where they luckily had a sunny airy window.


Mushrooms Growing Around My Potato Plant!


I love mushrooms just as much a the next person hates them, but c'mon!  There's something definitely wrong with this picture.  I woke up and was doing my daily check on all my plants and stopped short when I saw that one of my potato plants was surrounded by mushrooms, quite disgusting really.  Am I watering them too much?  It seems to be the first thing that comes to mind, afterall mushrooms love damp moist places right?


Well I simply couldn't just let the mushrooms sit there crowding around the potato plant now could I? The thought of touching the mushrooms was unbearable and even though what I really wanted to do was walk away and pretend none of this was happening, I kneeled down on my knees like a good little girl and got to it, they were moist,  slimy and really, really gross.  And then when I managed to take off all the mushroom growing around the stem I realized the root was still in the ground (pictured below) so to make matters worse I had to dig the mushroom base out, ugh. 


So I've come to the conclusion that the potato plant can do with less watering and more dry time, slowly the mushrooms seem to be going away, they only pop up every now and again- that has to be a good sign, I just hope the potatoes themselves have not been affected by all this, then again, maybe I should brace myself during harvesting time for mushroom laden potatoes.


Anti-Hopper Flour Dusting, Does It Or Doesn't It Work?


Recently I went over a couple of methods of keeping away hoppers from my bush plant.  My first method was the dishsoap and water liquid solution which I came to the conclusion barely worked at all.  Then I had read somewhere about dusting the plants with baking flour, the flour acts as a glue and seals the hoppers' mouths shut after taking a bite out of a dusted leaf, cruel I know.  Well I dusted the bush bean leaf and it's been a couple of weeks since, so here is the result...

Dusting plants under hopper attack.... Works!  I was actually pretty amazed, I thought if the dishsoap and water liquid solution didn't work then everything else was helpless as well (I really don't know what gave me that idea in the first place).  After dusting, the bush bean was visited by two different hoppers in that same week of dusting but I haven't seen any since, what a relief!  Although, I am quite concerned that I am killing the cute little things, I'm hoping in their little insect world they're singing to each other passing the word around, "don't go near that bush bean, it'll kill you".


Read previous post Oh For Goodness Sake! Grasshoppers!


Taste Of The First Fig


We have a fruiting fig tree, unfortunately I can't take credit to all the beautiful fruit trees in our yard (which there are aplenty, my husband and I really lucked out on finding this house) the previous owners were happy growers themselves and planted many different types of flowers, plants and yes, fruit trees.

When I walked into Wholefoods a week or two ago I realized beautiful purple figs were out and being sold and I became concerned that the figs on our tree, although fruiting, were not ripening.  Then I came out the other day and realized there were two purple figs on the tree, boy did that draw a huge gasp and smile on my face- I absolutely love figs!  They're such a pretty purple and cute too before you devour them of course.


3 days have gone by and I've been eyeing that purple fig, I went over to it today and gave it a little touch with my fingertips and realized the fig was soft to the touch, it probably should have stayed on the tree for a little bit longer in all honesty but I couldn't help myself.  I pulled that fig from the tree and ran inside, there was only one thing on my mind, eating it.  It was the most delicious fig I've ever had, whether it's because mr. Fig came from my own tree or if it actually was that delicious, I'm unsure- couldn't it be a little bit of both?

Just thought I'd share, until next time... Happy growing!


Brewing Up A Tea Of Sea Kelp For Your Plants' Potassium Needs


You may be saying to yourself "Sea kelp! Where the heck am I going to find that?!" The thought of going for a swim in the cold pacific doesn't sound too great simply to be dragging in all the sea kelp you can get your hands on, fortunately it's a lot easier to find than that. Going to your nearest asian market should do the trick, most asian markets will carry all different kinds of brands and bags of this stuff. Usually sold dried, sea kelp looks like (pictured above).

There's two ways to dole out this potassium rich stuff, brew it up as tea or simply crush it and add it straight to the ground. For one reason or other I like to brew up a batch of sea kelp tea, I suppose my subconscious is telling me that liquid source of nutrients for plants get through faster, much like our own bodies, of course I haven't the slightest clue whether this is true. But this is how I do it.

I take three pieces of dried sea kelp and put it in a glass jar and fill it up with boiling water. The sea kelp hydrates and gets rather large so don't be fooled by your small shriveled pieces. Let the brewing sea kelp tea sit for a few hours to a day to fully cool down and when ready you can pour it straight into the ground or load a spray bottle with the home made tea and spritz it on the foliage of your plants.


Potassium in plants help to regulate photosynthesis and the intake of nutrients through-out the plant, it can also help plants through bouts of stress. Usually potassium deficient plants produce thin skinned, small fruit and the plant itself can exhibit a thin and weak appearance. What's more, sea kelp also contains iron (plus other minerals and vitamins!) which is needed for plants' chlorophyll production, iron-deficient plants' exhibit the production of new leaves that are yellow when they should be green.


Caught In The Act: Slender Beans Pushing Forth

 The flowering stage of the bush bean begins with a little pod that look like a little bean

The bean-like pod peels back to reveal pastel-yellow colored petals, at this point the flowers have fully bloomed

And finally the whole flower is pushed out by the growing slender bean


A Source Of Nitrogen From Your Daily Coffee


The benefit of coffee grounds doesn't stop at warding away those slime-ball slugs but also has a great nutritional value to your plants, nitrogen!  Plants need nitrogen in order to grow lush and happy leaves, should you find that your plant is stunted in growth or exhibits sallow, yellow leaves when they obviously should be green, nitrogen just may be the thing that you need, and what do you know?!  You really want to make yourself a cup of coffee right now, what a coincidence.  So it's awesome that you can add nitrogen right into the ground so easily but be careful not to over-do it.  A sprinkle once in a while should be okay but coffee grounds which is highly acidic can do more harm than good if sprinkled too often, the acidity of the coffee grounds can burn the leaves and probably other vital parts of your growing plant.  

If you find that your plants are tall, lanky and weak under its own weight you may have a case of excess nitrogen.  Excess nitrogen causes plants to be so focused on building up their leaves that they forget to flower, fruit and grow strong in other areas where they should be, *ahem, for example the stem, hence the tall, lanky and weak characteristics of over-nitrogen'd plants.  But if you absolutely love the fact that you can use your coffee ground for your plants (like me) and find yourself debating whether or not to use the coffee grounds... again (also like me), simply toss the filter and grounds into the compost, in almost no time at all you'll be able to use it all over your garden without it be too acid-harmful to your plants.


Epsom Salt, A Great Magnesium Solution


If it's magnesium they want, it's magnesium they'll get!  A good solution to adding magnesium to plants that need it is an easy-to-make-at-home liquid solution that consists of water and epsom salt, in a spray bottle mix 1tsp of epsom salt for every 1qt. of water, yes, it's that easy.  Lack of magnesium can result in stunted growth and can be spotted when mature (older) leaves of plants are turning yellow while their veins continuously stay dark green, when this occurs spray this magnesium solution straight into the soil or even on the leaves of the plant.  Another great way to use this magnesium solution is to spray it onto plants that are having a hard time fruiting, simply give the blooms a spritz.  But be careful not to be too heavy-handed with the magnesium, an over-dose on magnesium can prohibit the plant from taking in other much needed nutrients, so use sparingly.


First Of The Main Attraction: Slenderette On The Bush Bean


It's only been a couple days since the first flowers began to bloom on the bush bean and just as anticipated came forth the first show of a bean.  It's a cute little thing that will surely become larger, beautiful, slender beans.


Some of you may be wondering why I'm posting "First Bloom" or "First Of The Main Attraction" which is aimed towards posting pictures and a few words of the first signs of the vegetable growing (which I think is absolutely exciting and fantastic- partially the reason why I choose to post them).  However the main reason for doing so is that as a novice gardner (which I am, I do not deny that), I know it can be hard to tell what is what, I'm hoping that for some of you it will bring about a familiarity of what is what growing in your garden, 'is it a bloom or is it a bean?', 'is it a weed or isn't it?', 'is that the seedling growing that I planted or has some random plant rooted in it's place?', These are all questions I continue to have in my own garden and some of you probably have these same questions too.  But if not I hope that you'll at least enjoy the pics of nature taking it's course.


Take a look at the previous post on the First Bloom of the bush bean
Take a look at the later post, Caught In The Act: Slender Beans Pushing Forth


2 Ways To Thinning: The Hard Way & The Easy Way

There are two ways to thinning your garden, the simple way is to pluck out the smaller, weaker looking seedling and toss it into the compost bin and say good-bye forever.  The second way of thinning is through transplanting which consists of digging out all your plants (roots and all) and replanting them individually spaced out appropriately for mature growth.

Many of the seed packets I've come across have directions that suggest planting 3 seeds per  hole then thinning the plants out once they've reached about 2" tall.  Sometimes not all your seeds will germinate and so even after planting 3 seeds, only 2 or even 1 will sprout, all 3 will sprout if your lucky.  But even knowing I could have it easy and simply pull out the weaker seedlings when thinning I always choose to transplant instead, I just can't seem to get myself to simply pluck those little babies and say good-bye (I suppose that's the novice gardener in me). Veteran gardeners always seem to say that thinning by saying good-bye is always the best way to go, after hearing their explanations I can understand why.  With transplanting you risk losing all the seedlings by digging them up, not only do most plants find this move stressful but you also have to make sure not to damage the roots< A very good reason to nix the transplanting in my opinion, especially if you suffer from unsteady hands.

And though most veteran gardeners generally have this common belief regarding transplanting versus the 'good-bye' thinning method, I've had thus far, fairly good odds with transplanting results, even with seedlings that are too small to be transplanted (ie. thinning my lettuce bed).  Thinning by transplanting my tomato seedlings was equally successful and I was 5 for 5, all my transplants survived though one did look quite disheveled for days, but it wasn't anything a bit of added nutrients and good watering couldn't fix.

So I guess the question remains, do you thin out your plant bed by transplanting or say 'good-bye'?  I say the choice is yours, but you should try to transplant at least once, it's a bit of fun and you can make a more experienced decision that way.


Thinning The Tomato Plants


Oh goodness, here we go again.  As my tomato seedlings have reached about 2-inches tall it's time to thin them out (as in spread them out), don't want them fighting for space now do we. I get flashback attacks of the time not that long ago when I had to thin out the lettuce bed, trembling sweaty hands and heart racing. The experience was absolutely nerve racking but it turned out pretty well, only lost two little lettuce seedlings that hated me enough for it to commit suicide. The lettuce seedlings were quite a bit smaller than these 2-inch tall seedlings so I figure I should do fine.

Currently the tomato seedlings are in a state of agitation (as pictured above), they're like little children who don't want to share.  So the goal is to thin them out so they all can have their own little space (as seen below).


1st step, digging out the seedlings.  With my spade in hand I dug deep and far away from the seedlings to remove them from the ground without harming the roots in any way.  I set the seedlings still in their original soil aside and proceeded to the 2nd step, digging new holes in the plant bed for the seedlings' new home, one hole for every seedling, all holes 1.5-ft apart from eachother.


3rd step, I then went on to what I think is the most difficult part of thinning out any plant bed, separating the seedlings.  The roots are quite fragile and so being ginger and patient when separating the whole plant (roots and all) is key.  The leaves if harmed will grow back, but the roots if harmed will kill the entire plant.  I think I may have lost one tomato seedling during this process but 1 out 5 isn't so bad, right?

4th step, I placed individual seedlings in the freshly dug holes (one seedling per hole) with fresh soil and covered with fresh soil so that the root was well below the soil line but not so far down that the soil line was too far up the seedling stem.


Now you can see how much happier the tomato seedlings are in their own little space (pictured above).  

I also felt that this was a very good time to put in some structural support for the tomatos which would eventually get about 6-ft tall (I sure do hope they survive to make it that high- that would be exciting!). I figure it would be more difficult for me to put in some kind of support when the plants are bigger as their roots would be longer and thus easier to harm.  Since I have limited supplies I decided to use this circular support for three of the tomato plants, the idea is that (and I hope this works) the tomato plants can grow on each side of the circle, seems pretty iffy but I'm 80% sure it'll work.


So, now with my second thinning experience behind me I'm a pro, right?