Growing In-Doors Versus Growing Out-Doors

Growing in-doors may seem like an easier task than growing out-doors but in my experience I found that growing in-doors can be a lot more of a challenge.  Giving the plant the natural environment it needs to grow properly and healthily can be an obstacle when you don't have what is necessary, sometimes even creating that environment doesn't work out the way you want it to.

Proper air-circulation was the most vital factor that my plants lacked when growing in-doors, this caused quite a few bugs to arise from unhealthy plants as well as other infections. Air-circulation is just as important  as the amount of water and sun the plant gets and is most definitely not to be overlooked when considering growing plants in-doors, this obviously can affect where you place your growing plants.  In most cases the plant will be placed next to a sunny window but if that particular sunny window doesn't get enough air coming in then you may have a problem, as I had... with bugs in particular, and I think we can all agree that bugs is not something one wants a problem with in their home.  If you have a sunny window with a good amount of air coming through always opt to place plants next to that particular window, whatever kind of vegetable plant you are growing doesn't matter when it comes to air-circulation, they all want it.

Whichever type of home you have, whether apartment or home, if you have a spot outside where you can place your growing plants, do so.  The important thing to remember is that you don't need to have a yard to grow, a fire escape for potted plants or a window ledge for boxed planter beds also are good places, this way your plants can get proper air flow.

MY EXPERIENCE growing in-doors versus out-doors
When I first decided to grow vegetables I was living in a one-bedroom apartment with one sunny window that didn't get too much air flowing in and out.  I lined quite a few plants on that one sunny window and made sure to keep the windows open during the day, I figured if my plants had any problems it was more likely due to lack of sun, as it happens it wasn't so much the lack of sun light rather than the lack of air-circulation.  At some time little flying bugs became a problem, the problem had gotten bad enough for me to put out little dishes of vinegar to trap and drown them (I caught quite a few that way :)  At the time I figured I just wasn't that good at growing and I still believe that somewhat but have slowly been gaining confidence since I've started my organic garden in my new yard, which I'm finding to be loads easier.

Today, as my plants begin to grow in my yard out-doors I'm beginning to realize that perhaps it wasn't really so much that I didn't know how to grow but that the external conditions simply wasn't good enough to grow healthy plants in my apartment.  Plants need a certain amount of full-sun exposure, need certain amount of watering and proper air-circulation, all these things are naturally available outside and requires discipline, hard-work and diligence to create that natural environment in a setting where it is not available.

But don't be disheartened should you be an in-door grower, I have seen many apartment dwellers build perfectly beautiful small garden in-doors on their window sill, on the fire escape and even inside their apartments where they luckily had a sunny airy window.


Mushrooms Growing Around My Potato Plant!


I love mushrooms just as much a the next person hates them, but c'mon!  There's something definitely wrong with this picture.  I woke up and was doing my daily check on all my plants and stopped short when I saw that one of my potato plants was surrounded by mushrooms, quite disgusting really.  Am I watering them too much?  It seems to be the first thing that comes to mind, afterall mushrooms love damp moist places right?


Well I simply couldn't just let the mushrooms sit there crowding around the potato plant now could I? The thought of touching the mushrooms was unbearable and even though what I really wanted to do was walk away and pretend none of this was happening, I kneeled down on my knees like a good little girl and got to it, they were moist,  slimy and really, really gross.  And then when I managed to take off all the mushroom growing around the stem I realized the root was still in the ground (pictured below) so to make matters worse I had to dig the mushroom base out, ugh. 


So I've come to the conclusion that the potato plant can do with less watering and more dry time, slowly the mushrooms seem to be going away, they only pop up every now and again- that has to be a good sign, I just hope the potatoes themselves have not been affected by all this, then again, maybe I should brace myself during harvesting time for mushroom laden potatoes.


Anti-Hopper Flour Dusting, Does It Or Doesn't It Work?


Recently I went over a couple of methods of keeping away hoppers from my bush plant.  My first method was the dishsoap and water liquid solution which I came to the conclusion barely worked at all.  Then I had read somewhere about dusting the plants with baking flour, the flour acts as a glue and seals the hoppers' mouths shut after taking a bite out of a dusted leaf, cruel I know.  Well I dusted the bush bean leaf and it's been a couple of weeks since, so here is the result...

Dusting plants under hopper attack.... Works!  I was actually pretty amazed, I thought if the dishsoap and water liquid solution didn't work then everything else was helpless as well (I really don't know what gave me that idea in the first place).  After dusting, the bush bean was visited by two different hoppers in that same week of dusting but I haven't seen any since, what a relief!  Although, I am quite concerned that I am killing the cute little things, I'm hoping in their little insect world they're singing to each other passing the word around, "don't go near that bush bean, it'll kill you".


Read previous post Oh For Goodness Sake! Grasshoppers!


Taste Of The First Fig


We have a fruiting fig tree, unfortunately I can't take credit to all the beautiful fruit trees in our yard (which there are aplenty, my husband and I really lucked out on finding this house) the previous owners were happy growers themselves and planted many different types of flowers, plants and yes, fruit trees.

When I walked into Wholefoods a week or two ago I realized beautiful purple figs were out and being sold and I became concerned that the figs on our tree, although fruiting, were not ripening.  Then I came out the other day and realized there were two purple figs on the tree, boy did that draw a huge gasp and smile on my face- I absolutely love figs!  They're such a pretty purple and cute too before you devour them of course.


3 days have gone by and I've been eyeing that purple fig, I went over to it today and gave it a little touch with my fingertips and realized the fig was soft to the touch, it probably should have stayed on the tree for a little bit longer in all honesty but I couldn't help myself.  I pulled that fig from the tree and ran inside, there was only one thing on my mind, eating it.  It was the most delicious fig I've ever had, whether it's because mr. Fig came from my own tree or if it actually was that delicious, I'm unsure- couldn't it be a little bit of both?

Just thought I'd share, until next time... Happy growing!


Brewing Up A Tea Of Sea Kelp For Your Plants' Potassium Needs


You may be saying to yourself "Sea kelp! Where the heck am I going to find that?!" The thought of going for a swim in the cold pacific doesn't sound too great simply to be dragging in all the sea kelp you can get your hands on, fortunately it's a lot easier to find than that. Going to your nearest asian market should do the trick, most asian markets will carry all different kinds of brands and bags of this stuff. Usually sold dried, sea kelp looks like (pictured above).

There's two ways to dole out this potassium rich stuff, brew it up as tea or simply crush it and add it straight to the ground. For one reason or other I like to brew up a batch of sea kelp tea, I suppose my subconscious is telling me that liquid source of nutrients for plants get through faster, much like our own bodies, of course I haven't the slightest clue whether this is true. But this is how I do it.

I take three pieces of dried sea kelp and put it in a glass jar and fill it up with boiling water. The sea kelp hydrates and gets rather large so don't be fooled by your small shriveled pieces. Let the brewing sea kelp tea sit for a few hours to a day to fully cool down and when ready you can pour it straight into the ground or load a spray bottle with the home made tea and spritz it on the foliage of your plants.


Potassium in plants help to regulate photosynthesis and the intake of nutrients through-out the plant, it can also help plants through bouts of stress. Usually potassium deficient plants produce thin skinned, small fruit and the plant itself can exhibit a thin and weak appearance. What's more, sea kelp also contains iron (plus other minerals and vitamins!) which is needed for plants' chlorophyll production, iron-deficient plants' exhibit the production of new leaves that are yellow when they should be green.


Caught In The Act: Slender Beans Pushing Forth

 The flowering stage of the bush bean begins with a little pod that look like a little bean

The bean-like pod peels back to reveal pastel-yellow colored petals, at this point the flowers have fully bloomed

And finally the whole flower is pushed out by the growing slender bean


A Source Of Nitrogen From Your Daily Coffee


The benefit of coffee grounds doesn't stop at warding away those slime-ball slugs but also has a great nutritional value to your plants, nitrogen!  Plants need nitrogen in order to grow lush and happy leaves, should you find that your plant is stunted in growth or exhibits sallow, yellow leaves when they obviously should be green, nitrogen just may be the thing that you need, and what do you know?!  You really want to make yourself a cup of coffee right now, what a coincidence.  So it's awesome that you can add nitrogen right into the ground so easily but be careful not to over-do it.  A sprinkle once in a while should be okay but coffee grounds which is highly acidic can do more harm than good if sprinkled too often, the acidity of the coffee grounds can burn the leaves and probably other vital parts of your growing plant.  

If you find that your plants are tall, lanky and weak under its own weight you may have a case of excess nitrogen.  Excess nitrogen causes plants to be so focused on building up their leaves that they forget to flower, fruit and grow strong in other areas where they should be, *ahem, for example the stem, hence the tall, lanky and weak characteristics of over-nitrogen'd plants.  But if you absolutely love the fact that you can use your coffee ground for your plants (like me) and find yourself debating whether or not to use the coffee grounds... again (also like me), simply toss the filter and grounds into the compost, in almost no time at all you'll be able to use it all over your garden without it be too acid-harmful to your plants.


Epsom Salt, A Great Magnesium Solution


If it's magnesium they want, it's magnesium they'll get!  A good solution to adding magnesium to plants that need it is an easy-to-make-at-home liquid solution that consists of water and epsom salt, in a spray bottle mix 1tsp of epsom salt for every 1qt. of water, yes, it's that easy.  Lack of magnesium can result in stunted growth and can be spotted when mature (older) leaves of plants are turning yellow while their veins continuously stay dark green, when this occurs spray this magnesium solution straight into the soil or even on the leaves of the plant.  Another great way to use this magnesium solution is to spray it onto plants that are having a hard time fruiting, simply give the blooms a spritz.  But be careful not to be too heavy-handed with the magnesium, an over-dose on magnesium can prohibit the plant from taking in other much needed nutrients, so use sparingly.


First Of The Main Attraction: Slenderette On The Bush Bean


It's only been a couple days since the first flowers began to bloom on the bush bean and just as anticipated came forth the first show of a bean.  It's a cute little thing that will surely become larger, beautiful, slender beans.


Some of you may be wondering why I'm posting "First Bloom" or "First Of The Main Attraction" which is aimed towards posting pictures and a few words of the first signs of the vegetable growing (which I think is absolutely exciting and fantastic- partially the reason why I choose to post them).  However the main reason for doing so is that as a novice gardner (which I am, I do not deny that), I know it can be hard to tell what is what, I'm hoping that for some of you it will bring about a familiarity of what is what growing in your garden, 'is it a bloom or is it a bean?', 'is it a weed or isn't it?', 'is that the seedling growing that I planted or has some random plant rooted in it's place?', These are all questions I continue to have in my own garden and some of you probably have these same questions too.  But if not I hope that you'll at least enjoy the pics of nature taking it's course.


Take a look at the previous post on the First Bloom of the bush bean
Take a look at the later post, Caught In The Act: Slender Beans Pushing Forth


2 Ways To Thinning: The Hard Way & The Easy Way

There are two ways to thinning your garden, the simple way is to pluck out the smaller, weaker looking seedling and toss it into the compost bin and say good-bye forever.  The second way of thinning is through transplanting which consists of digging out all your plants (roots and all) and replanting them individually spaced out appropriately for mature growth.

Many of the seed packets I've come across have directions that suggest planting 3 seeds per  hole then thinning the plants out once they've reached about 2" tall.  Sometimes not all your seeds will germinate and so even after planting 3 seeds, only 2 or even 1 will sprout, all 3 will sprout if your lucky.  But even knowing I could have it easy and simply pull out the weaker seedlings when thinning I always choose to transplant instead, I just can't seem to get myself to simply pluck those little babies and say good-bye (I suppose that's the novice gardener in me). Veteran gardeners always seem to say that thinning by saying good-bye is always the best way to go, after hearing their explanations I can understand why.  With transplanting you risk losing all the seedlings by digging them up, not only do most plants find this move stressful but you also have to make sure not to damage the roots< A very good reason to nix the transplanting in my opinion, especially if you suffer from unsteady hands.

And though most veteran gardeners generally have this common belief regarding transplanting versus the 'good-bye' thinning method, I've had thus far, fairly good odds with transplanting results, even with seedlings that are too small to be transplanted (ie. thinning my lettuce bed).  Thinning by transplanting my tomato seedlings was equally successful and I was 5 for 5, all my transplants survived though one did look quite disheveled for days, but it wasn't anything a bit of added nutrients and good watering couldn't fix.

So I guess the question remains, do you thin out your plant bed by transplanting or say 'good-bye'?  I say the choice is yours, but you should try to transplant at least once, it's a bit of fun and you can make a more experienced decision that way.


Thinning The Tomato Plants


Oh goodness, here we go again.  As my tomato seedlings have reached about 2-inches tall it's time to thin them out (as in spread them out), don't want them fighting for space now do we. I get flashback attacks of the time not that long ago when I had to thin out the lettuce bed, trembling sweaty hands and heart racing. The experience was absolutely nerve racking but it turned out pretty well, only lost two little lettuce seedlings that hated me enough for it to commit suicide. The lettuce seedlings were quite a bit smaller than these 2-inch tall seedlings so I figure I should do fine.

Currently the tomato seedlings are in a state of agitation (as pictured above), they're like little children who don't want to share.  So the goal is to thin them out so they all can have their own little space (as seen below).


1st step, digging out the seedlings.  With my spade in hand I dug deep and far away from the seedlings to remove them from the ground without harming the roots in any way.  I set the seedlings still in their original soil aside and proceeded to the 2nd step, digging new holes in the plant bed for the seedlings' new home, one hole for every seedling, all holes 1.5-ft apart from eachother.


3rd step, I then went on to what I think is the most difficult part of thinning out any plant bed, separating the seedlings.  The roots are quite fragile and so being ginger and patient when separating the whole plant (roots and all) is key.  The leaves if harmed will grow back, but the roots if harmed will kill the entire plant.  I think I may have lost one tomato seedling during this process but 1 out 5 isn't so bad, right?

4th step, I placed individual seedlings in the freshly dug holes (one seedling per hole) with fresh soil and covered with fresh soil so that the root was well below the soil line but not so far down that the soil line was too far up the seedling stem.


Now you can see how much happier the tomato seedlings are in their own little space (pictured above).  

I also felt that this was a very good time to put in some structural support for the tomatos which would eventually get about 6-ft tall (I sure do hope they survive to make it that high- that would be exciting!). I figure it would be more difficult for me to put in some kind of support when the plants are bigger as their roots would be longer and thus easier to harm.  Since I have limited supplies I decided to use this circular support for three of the tomato plants, the idea is that (and I hope this works) the tomato plants can grow on each side of the circle, seems pretty iffy but I'm 80% sure it'll work.


So, now with my second thinning experience behind me I'm a pro, right?


A Rickety Lettuce-Bed Cover


As the lettuce in the old sink plant bed grew taller I realized that I needed to find another way to cover them up, at the time I simply had laid an old window screen straight on top of the sink, it worked great for a while but the lettuce was beginning to outgrow it.  One day out in the yard I figured I had enough energy to make a taller frame out of stray pieces of wood laying about the yard, a bird net and the old window screen.  My plan seemed rather simple at the time and consisted of putting four wood stakes into the ground at each outer corner of the sink to serve as the frame, then securing the bird net by stapling it along to the wood and using the old window screen to top it all off< Now that I think about it it seems a pretty ridiculous plan. I hadn't taken into consideration what the soil condition was like around the lettuce bed, it was of course as fate would have it un-stake-able, the dirt there (for I can't even call it soil) is hard as a rock.

My husband had a great plan to build a frame but I, the stubborn mule that I am, fought him on it tooth and nail though I hadn't a clue what to do. And in my effort to be right and thus do it my way I had him instead help me build this rickety frame, (the thing sways- its quite funny actually).  Instead of putting the stakes in the ground we nailed crossbars so that the four legs could stand on their own, it's not very sturdy at all and only seems to have no problem standing upright with the help of the window screen sitting on top of it.  I shake my head in shame when I think about how much easier, nicer-looking and sturdier it could have been had I just listened to my husband in the first place.

So the lesson is, if you have a man or friend about that offers to make a frame for you... just let them do it.


First Bloom: Bush Bean (Slenderette Variety)


I came outside today and saw a few little nodes forming on my bush bean (slender variety).  The nodes turned into these beautiful little flowers...


The flowering of the bush bean is a sign that beans will be forming shortly, beans that are beautiful slender, tender... and delicious!  Just thought I'd just give you the first look at the first bloom of the bush bean.

Oh, and if you haven't been keeping up the white stuff on the bush bean leaves is baking flour, something I'm trying to keep the hoppers away, more on whether the anti-hopper baking flour method works or not later.

Reap & Eat: A Green Salad from Freshly Grown Mixed Baby Lettuce


When you're as impatient as I am everything seems slow to grow, at first.  Naturally this was the case with the mixed baby lettuce I'm growing in an old sink (my way of recycling, not sure if you can even call this recycling).  Then the lettuce seemed to grow over night, day after day the lettuce filled out the sink and it was just as I imagined it would be... an old sink plant bed full of beautiful, lush, edible greens!  I did it!  I did it!  :D  This really is quite an achievement for me, remember I'm the girl that managed to have only one surviving tomato plant out of eleven or so different veg I tried to plant a year ago. Ah~ life is beautiful... today.

So, by the looks of it I needed to make a green salad, after all the sink bed is looking quite crowded and so a good trim would be a very wise thing to do.  

First, let me explain the master plan by which I plot to eat these fresh tender greens, the plan is called "Cut and come again".  The "Cut and come again" method is cutting the leafy lettuce when they are no shorter than 4-5 inches tall, cut them 1-2 inches above the soil, and the lettuce will grow back (or keep growing I should say to be more precise).  Apparently you can repeat this method for another three or four times or until the lettuce begins tasting like rubber, which probably would be a great time for me to dump it into the compost and start anew, or if I was smart I would have already started another lettuce bed (but I haven't yet and really should :/ *shrug).  I cut only what I needed and left the rest to keep growing.

With my kitchen sheers and bowl I went out to gather some fresh mixed baby greens.  I cut only the leaves that were 4 inches or taller and left 1 inch above the soil line.  I thought there wouldn't be nearly enough for two but there was, looks can be awfully deceiving (a very important all-around life lesson).


The greens were indeed fresh and I was able to tell immediately by the moist buttery texture.  I dressed the mixed baby greens with a very easy-to-make red wine vinaigrette.

Ingredients I needed:
Red wine vinegar
Olive oil
Salt & Pepper
1 Small minced or squished garlic (I always squish my garlic since it's much easier to do with my handy dandy garlic squisheing gadget thingy)

What I did to make red-wine vinaigrette:
1.  In a small bowl I poured the olive oil and red wine vinegar, 3 parts olive oil and 1 part vinegar (sometimes I really want to taste the tangy vinegar and so I'll add a little more than a 3:1 ratio but I never really go past 2:1).

2.  I Add two pinches of salt and four grinds of black pepper (I love pepper, never can get enough of the stuff).

3.  Then I squished a small clove of garlic right into the mixture.

4.  And whisked away with a fork until the mixture was emulsified.


Getting The Most Out Of Your Potatoes By Challenging


If there is any vegetable in your growing garden that loves a good challenge it'll be the potatoes. Challenging your potatoes to make even more potatoes by 'hilling' is a common practice.  The process is very simple and goes something like this...

1.  Plant your potatoes and watch them grow

Once your potato plants grow to about 8inches to 1foot above the ground...

2. Mound soil 3/4 of the way up along the stem (as pictured below)


Eventually the potato plant will grow new shoots underneath the buried portion allowing more potatoes to sprout, hence the popular economical aspect of potatoes.


Read the previous post, DIY Potatoes In A Bottomless Planter Box


DIY: Cucumber And Bottle Cloche Are Good Friends


I planted two cucumber seeds on both sides of a wooden frame structure in the middle of the yard, the plan was to have the cucumbers climb the wooden beam and up the wooden structure to create height and beautiful green foliage around this otherwise old and rickety frame.  Within 5 days of planting the seeds the little cucumber seedlings with rather cute and rounded seed leaves popped up out of the ground, I immediately took to saving the seedlings from outside forces such as birds and slugs.  I sprinkled coffee ground around the seedlings and put a cover of strawberry baskets I had saved for such an occasion.  The very next day as I walked around the yard inspecting all the vegetables and fruit plants I am endeavoring to grow (something I do daily) I realized that one of the cucumber seedlings was gone, completely gone.  I stared at the ground where the seedling used to be and was confounded, there was no seedling at all, it was as if it had not existed, this was quite odd as usually there is some remanence of the plant left even if it has been attacked, but there was none at all.  I dug with my fingers where the seedling used to be and not even the root was found- very odd.  When I found that the seedling was missing I immediately thought the slugs had gotten to it but I never found slugs to be so thorough before.  Still, I do not know what it was that took that little cucumber seedling.  Naturally I replanted another right away but before doing so took the precaution and made a bottle cloche for the remaining cucumber seedling that had escaped this unfortunate happening.

My worry with the bottle cloche was that it would not allow enough air circulation resulting in some kind of unwanted growth due to moisture buildup, this was not the case however, instead I find that the cucumber seedling loves and thrives in the warmth and moisture the cloche allots it.  While waiting for my replanting seedling to germinate and sprout I took to a watchful eye on the lucky surviving seedling that I had covered with the bottle cloche, indeed the seedling grew larger and healthier looking, the seedling leaves growing rounder and sturdier, and has yet to be eaten by the mysterious thing that ate the first.  So when the replanted seedling finally sprouted four days later I immediately knew what I had to do to keep it protected, healthy and happy.


WHAT I NEEDED:
Scissors
Exacto knife (or any sharp knife to cut through a plastic bottle)
A plastic bottle (without the cap)


WHAT I NEEDED TO DO:
1. Carefully, using the exacto knife and scissors cut the bottle in half (towards the end of the cut the exacto knife was difficult to use to make the final slice and so I used the scissors to make the final cut).


2.  Place the cloche with cut-side down into the ground around the plant with the hole at top for air-circulation.


Anti-Grasshopper (Dishsoap & Water) Solution, Does It Work?


Over the past weekend I decided to regain control of the bush bean from the rampant baby hoppers that have been demolishing the leaves, quite literally too!  Boy do these little things have an appetite, half to a whole leaf can be gone over night!  As a way of defending the bush bean I mixed a solution of water and dish soap (2tbsp/1gal water) where I read somewhere was supposed to work.  I sprayed the leaves of the bush bean and gave it a couple of days to see what would happen, everyday that past I looked in on the bush bean carefully taking note if there were any new missing leaves or baby hoppers still hanging about.

As you can see from the picture below the hoppers didn't miraculously disappear but my leaves continuously did.  Okay, okay so I may be exaggerating a bit... in all honesty, the solution may have worked a little bit but not entirely and not nearly enough in my opinion, every day I find a new hoppers on my bush bean and I've noticed that they found the second bush bean as well, so here's to finding a new way!  I really didn't want to go to the extent of killing these little dudes (because they are kinda cute) but I'm afraid my choices are very limited and I'd rather have my bush beans than a yard full of hoppers.

So... Second line of attack, dusting the bush beans with baking flour.  Apparently a good dusting of baking flour will kill the hoppers, when they try to eat the leaves covered with baking flour the flour acts as a glue in their mouth sealing their mouths shut, eventually they die of starvation (which is kind of sad I know) but here goes for the sake of saving the bush bean and finding out what works!


WHAT I NEEDED (and what you'll need too if you decide to give this a go):
1. 1/2-1 cup of baking flour (I used all purpose flour since that's all I had in the pantry, I figure flour is flour? - I hope)

2. Sifter (easier to dust with, I would have much rather preferred a smaller sifter but this is all I had, on the brighter side it'll cover more space in a short period of time).


Armed with my baking flour and my sifter of steel I traversed down and pass the creaky back patio and dusted with my all!... The bush bean.

At first there was a gust of wind and that didn't work out too well for me but gusts of wind in SoCal is pretty far and few inbetween, I only had to wait for a few seconds to go on with my dusting, and it only took me less than a minute.  I hope this works, we soon shall see so check-in for updates!  Until then, happy gardening!


Read the previous post, Oh For Goodness Sake! Grasshoppers!

Read the later post for results on baking flour dusting, Anti-Hopper Flour Dusting, Does It Or Doesn't It work?


Planting Basil Bought From Trader Joe's


In my haste to have basil in my garden (since it takes a really long time to grow and that's not even including set-backs) I bought a basil bush from Trader Joe's and gave it a pot of it's own so that it can 1. feel at home, and 2. grow into the pot (so hopefully it'll get bigger and bushier).

It took a bit of time to wiggle the root and soil out of the plastic container it was sold in but eventually when I did get it loose I was able to stick it into a good sized pot and fill it up with more soil and ended it with a good watering.  I gave the replanted basil bush a spot under the rose bush where the basil could get some spotted shade (apparently they really like that, the basil do tend to sulk in the sun and spotted shade is key).

I have a tendency to be heavy-handed with the watering at times and believe this was the misfortune that befell the basil I was trying to grow a year ago in my apartment.  I must keep it in mind that basil can be quite the sensitive plant about two things: too much water and too much sun.  Like I said above "spotted shade is key", and as for the watering... must remember to water when the basil soil has dried out for a day or so.  Here's to keeping the basil alive!


Today's Lesson: Know Thy Enemy, Grasshoppers


As with anything I run into that is of interest I look for as much information on it as I can.  Today's interest?  Grasshoppers.  I figure the more I know about these guys the better, "keep your friends close and your enemies closer", right?  Well they pose as enemies to my garden which makes them an enemy to me as well, after all, I do want to taste the lettuce, basil and bush beans at some point.


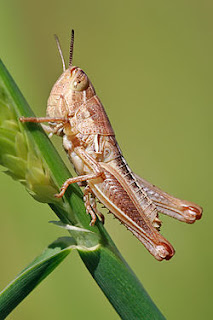
The physical structure of the grasshopper consists of antennae which are generally shorter in length than their bodies (opposed to roaches, which is the first insect I think about when thinking about insects with long antennae- ick!)  The female grasshopper is larger than the male grasshopper and can be distinguished from the males in many ways, one way is that the female grasshopper have two pairs of triangles at the end of their abdomen opposed to one single plate that the male has, the two pairs of triangles appropriately known as valves are used for laying eggs in the sand.  The valves are used to dig into the sand where the female grasshopper will lay her eggs.

The grasshopper also have tiny hairs all over the exterior of the body with the main purpose of acting as sensors. These little hairs are specially calibrated to respond to certain stimulus.  However the portion of the grasshopper that is the most sensitive to sensing are the antennae, part of the mouth and near the posterior.  Grasshoppers also have tympanal organs for sound reception.

Grasshoppers are easily confused with crickets, but are different in many aspects.

This is a cricket

The grasshopper diet consists mainly of grasses, leaves and cereal crops (as in grains).  Many grasshoppers eat a variety of plants making them polyphagous, and many tend to eat from multiple sources in one day (in my experience they jump from basil to bush bean).  Some grasshoppers however do feast on the same, one plant (monophagous), the monophagous grasshoppers are far fewer (about one out of 8,000).


The digestive system of a grasshopper consists of a foregut, midgut and a hindgut...

The function of the foregut (the mouth region):  the mouth is distinct due to the presence of a mandible and salivary glands.  It is the mandibles job to begin the mechanical portion of the digestion by chewing, but only very slightly.

The function of the midgut:  is where most of the food is handled in the crop which has the ability to hold food. The crop leads the food into the gizzard consisting of teeth like features.  From the gizzard the food enters the stomach where digestive enzymes help to break down particles.

The function of the hindgut (the anal region):  the hindgut, similar to human anatomy, is the portion of the digestive system that is focused on excreting the waste, which consists of uric acid, urea and amino acids, and are normally converted into dry pellets before being disposed.


SUGGESTED METHOD FOR TERMINATION:
Dusting host plants lightly with baking flour


*Read the full article on Wikipedia, Grasshopper